Studio 1
This studio has two goals:
- Begin practicing design critique
- Practice VueJS so you can develop interactive UIs
If you haven't already completed the pre-doing, do so now
Design critique
Get used to Yellkey
Web sites to look at
- What can you find (Bookmark this for later!)
Making a basic To-Do app
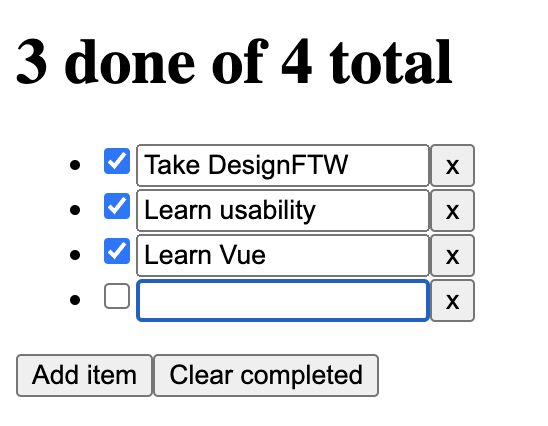
We will make a simple to-do list that:
- Displays number of done items and total items
- Allows you to delete items
- Allows you to add items
- Allows you to delete completed (done) items with one click
Then, if there is time, we will explore making usability improvements to our app.
If you need help, try our Vue Cheatsheet.
Step 1: Basic infrastructure
If you haven’t already, fork the studio1-starter repo
and open index.html in your local Visual Studio code editor.
Start a local server in that directory,
and open http://localhost:8000 (or whatever port you've specified) in your browser.
Step 2: Basic HTML
Edit index.html to add HTML for a list of tasks with one sample task.
That task should have:
- A checkbox representing whether the task is "done"
- An editable text field representing the task's description.
- A button to delete the task. You should also create buttons to add a new task and to clear all completed tasks. Just static HTML, don’t worry about it being functional yet!
Mini HTML cheatsheet for some elements you will need:
<h1>-<h6><ul>: Unordered list<li>: Unordered list item<input>: You'll want to usetype="checkbox"andtype="text"<button>(<input>can also be used for buttons — don’t do that)
We will not be using <label>
here, since there is no visible label either,
but in general you should use labels for all your form controls.
If you want to add more context for screen readers,
but there is no visible text to wrap with a label,
you can also use the aria-label attribute.
Step 3: Connecting the list of tasks to our HTML list
Right now, your HTML has one static item.
Let's start connecting our HTML to our data model.
Use v-for to tell Vue to template one list item per task in the data model.
Type app.addItem() in the console to make sure it works.
You should get an additional list item every time.
Step 4: Making the add button functional
If you look at index.js, it already provides three functions for you that modify data:
addItem(), deleteItem(i), and clearCompleted().
First, we'll just use addItem() which adds a new item with an empty description.
Use the @click action to make the add button in your template functional.
Do not worry about the other buttons until the next step.
Step 5: Connecting the inputs with data
Change the description of the first task in your to-do list or click its "done" checkbox.
Then type app.tasks[0] in the console.
What do you see? Its title and done properties are not changing!
This is because we have not yet connected our checkbox and text field to the data.
Use v-model to connect the done and title properties of each task to their corresponding form elements.
Make sure you use the variable you have specified for the current item.
If you write tasks.title instead,
Vue will not give you an error because this is not technically an error:
it will think you just want to write the title property on the tasks array,
which in JS is a valid thing to do (though not what you want here).
In JS, arrays are also objects, and can have arbitrary properties,
in addition to their items (which hang on numeric properties).
Step 6: Making the rest of the buttons functional
Now hook up the "Clear completed" button and the delete item button,
with the clearCompleted() and deleteItem(i) functions respectively.
Note that the deleteItem(i) function takes one parameter: the index of the item being deleted.
It will not work if you don’t provide any arguments.
Fortunately v-for supports an optional second argument that is the index of the current item: v-for="(task, index) in tasks"
Step 7: Showing number of items, and number of done items
Now let's display some statistics about our to-do list!
First, add something that shows the total number of items;
(array.length is useful here).
Let's also count how many items are done, i.e. how many objects have done == true.
You can filter
the array to only get items that are done with tasks.filter(t=> t.done). Don't worry about exactly
how this is working yet, we will cover Arrow functions later on.
One you filter the tasks, you can count the number of items using .length again.
Step 8: Improving efficiency
Now you have a fully functional to-do list, yay! Play around with it a bit, enter some tasks, mark some as done.
What do you notice? It’s a little annoying to use, isn’t it? You have to constantly switch from the keyboard (typing the task title) to the mouse (clicking on buttons, marking items as done).
In most to-do lists out there, there are established conventions for using them with the keyboard.
What are these and how can we implement them?
Show answer
One such convention, is that hitting Enter with the keyboard inserts a new item, and then focuses it.
You can use the keyup event,
with an enter modifier to do that.
This will insert new items when the Enter key is pressed, but they will not be focused.
Our index.js template includes a v-focus directive.
Basically, if you add v-focus to any element, that element will automatically receive focus when it is added to the document.
We need this because the built-in HTML autofocus attribute sadly works on page load, not element insertion.
You may also need to use the active property (see index.js) to indicate which item should be focused.
Going even further
This is entirely optional; it is much harder than the previous steps, and only for the brave souls that really want to dive in.
Another common convention is that backspace on an empty item deletes entries.
This is a trickier to implement, because you only want this to happen when the input is empty.
Also, managing focus becomes harder, because the elements that should receive it already exist,
so just using v-focus without a value will not work.
You can try at home if you want to do this, but it's out of scope for the studio. Some key ideas for implementation are:
- You will probably need to add a new method in
index.js,deleteItemIfEmpty(i) - You will need to set
v-focusto theactiveproperty, so you can manage focus by changing it - You will need to use
@focusand@blurto set theactiveproperty to the right item when inputs are focused, so that it's always current - You will need to make sure you focus the previous item after an item is deleted this way. Caveat: when deleting the first item, there is no previous item!